
filo/DigitalVision Vectors via G
Use diskpart to create, delete and modify disk partitions
Diskpart is one of the oldest disk management tools in Windows, but it remains useful for its advanced capabilities in automation and granular control compared to other utilities.
For basic disk operations on Windows systems, administrators can use diskpart, a command-line utility that remains useful for many different drive-related jobs more than 20 years after it was released.
Microsoft introduced the diskpart management tool in the Windows 2000 OS in 1999 and has included it all versions of Windows since. Diskpart scans for newly added disks, but it can also create, delete and resize drive partitions, as well as assign or reassign drive letters. Diskpart also works with drive volumes, virtual hard disks (VHDs) and removable media, such as USB flash drives. In addition to its management capabilities, diskpart can troubleshoot disk problems, fix corrupted partitions and recover data. The Disk Management utility is also included with Windows OSes and is a similar GUI-based tool, but it lacks the granular control and automation capabilities in diskpart.
Microsoft continues to develop diskpart, and the latest version features 38 commands. To use diskpart, list the objects, such as disks or partitions, and then select an object to change it.

Using diskpart requires understanding data storage terminology
Using diskpart effectively requires a basic understanding of Windows disk terminology. A basic disk is a storage device, such as a hard drive, solid-state drive or USB flash drive, which you format with a Windows file system.
A basic disk can hold one or several partitions in Windows. A partition is a logical structure confined to a single disk.
A volume is a construct of the OS that consists of one or more partitions that can span one or more disks.
Use caution when running diskpart commands
You should be careful when using diskpart because there is no undo function if you select the wrong object. For example, if you format a disk, then you lose any data on the disk.
Also, once a command is entered -- even a destructive one -- diskpart does not ask for confirmation before it runs. For example, if you perform an errant diskpart delete partition operation, you must use another utility, such as a third-party disk management program, to recover the data or use a backup image to restore the files from the drive.
There is no override function. You can use the Ctrl+C hotkey or close the command window to stop the ongoing diskpart operation, but this could lead to data corruption or introduce problems with disk functionality.
Follow these tips to avoid issues when using diskpart:
- Do not use diskpart until you back up the disk you plan to modify.
- Exercise caution when using diskpart on systems that use dynamic disks, which Microsoft still supports but considers a legacy feature.
- Check with your hardware vendor before using diskpart.
How to create a partition with diskpart
A disk partition sections off a portion of a physical hard drive. Partitioning a hard drive can be done for several reasons, such as organizing data in a more logical fashion or installing a different OS on each partition.
Diskpart performs the tasks of a disk partition manager. Partitioning your disk can help increase the I/O performance of hard disks newly added to RAID. The documentation for many server applications, such as Exchange Server, recommends using diskpart to create the primary or extended partitions. You can use a primary partition as the system partition; you can only use an extended partition for additional logical drive assignments.
The diskpart create command makes disk partitions, volumes on a single disk or multiple disks, and VHDs.
To run diskpart, open a command prompt, and run it as the administrator.
Take the following steps to create a partition with diskpart:
- Type diskpart.
- At the DISKPART prompt, type list disk. Note the drive number you wish to modify.
- At the DISKPART prompt, type select disk [number]. Replace [number] with the disk number to edit using the information from step two.
- At the DISKPART prompt, type create partition primary size=102400. The size parameter refers to the size in megabytes. In this case, 102400 equals 100 GB. Change the word primary to extended to create an extended partition. If you do not set a size, then all available space on the disk is used for the partition.
- At the DISKPART prompt, type assign letter=D. Choose an unused drive letter.
- At the DISKPART prompt, type exit.
- From the command prompt, use the format command, the Disk Management utility in Windows or any disk format tool to format the drive. It is typical to use New Technology File Sysem (NTFS) during the initialization process.
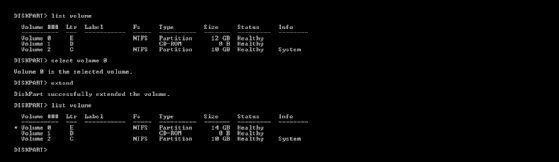
How to extend a partition with diskpart
When it comes to adjusting the space for a partition or volume, the following method is superior to configuring two disks. Dynamic disk extensions only concatenate the newly added space, meaning they just add the disk space to the end of the original partition without restriping the data.
Concatenation isolates performance within each partition and does not offer fault tolerance when the partition is configured in RAID. Diskpart restripes your existing data. This is beneficial when the partition is set up in RAID because the existing partition data spreads across all the drives in the array rather than just adding new space to the end, like the Disk Management utility.
Take the following steps to extend a partition with diskpart:
- Verify that contiguous free space is available on the same drive and this free space is next to the partition you intend to extend with no partitions in between. Be sure you have a full backup before executing this command.
- At a command prompt, type diskpart.
- At the DISKPART prompt, type select disk [number]. Enter the proper disk number to modify.
- At the DISKPART prompt, type select volume [number]. Choose the volume.
- At the DISKPART prompt, type extend. If you do not set a size, then diskpart uses all available space on the disk.
- At the DISKPART prompt, type exit.
How to delete a partition with diskpart
The delete command in diskpart removes dynamic disks, partitions, volumes and shadow copies. When you have multiple volumes on the disk or an unwanted partition, such as a recovery partition, this command removes them and returns them to unallocated space.
Take the following steps to delete a partition:
- At a command prompt, type diskpart.
- At the DISKPART prompt, type select disk [number]. Choose the disk to modify.
- At the DISKPART prompt, type list partition.
- At the DISKPART prompt, type select partition [number]. Enter the partition number to modify.
- At the DISKPART prompt, type delete partition.
- At the DISKPART prompt, type exit.
How to create a volume using diskpart
A volume is a logical construction the OS builds from one or several partitions. In Windows, you can create several volume types with diskpart: simple volume, spanned volume, striped volume, mirrored volume and RAID 5 volume.
A simple volume spans just one partition on a disk.
A spanned volume gathers space from several disks into one logical volume. This operation requires erasing the disks, building the partitions, extending one volume from one disk to the other disk to make the span and then formatting the new volume.
A striped volume, also called a RAID 0 volume, requires two or more disks. This arrangement is often used to boost performance with read/write speeds by spreading data across the drives.
A mirrored volume creates a copy of a volume on another disk, which is helpful to avoid data loss if a disk fails. A mirrored volume requires at least two disks that have the same size.
A RAID 5 volume is similar to a mirrored volume but uses parity information to distribute the data across disks. A RAID 5 volume requires at least three disks. This method is more scalable but has a slower recovery time compared to a mirrored volume.
Take the following steps to create a simple volume of 500 GB with diskpart:
- At a command prompt, type diskpart.
- At the DISKPART prompt, type list disk. Output shows available disks.
- At the DISKPART prompt, select disk [number]. Choose the disk for the volume.
- At the DISKPART prompt, type create volume simple size=512000.
- At the DISKPART prompt, type exit.
Take the following steps to create a spanned volume of 1 TB using two available disks:
- At a command prompt, type diskpart.
- At the DISKPART prompt, type list disk . See the available disks on the system.
- At the DISKPART prompt, type select disk [number]. Select the first disk.
- At the DISKPART prompt, type clean. This removes data and any existing partitions or volumes on the selected disk.
- At the DISKPART prompt, type create partition primary. This creates a partition on the disk.
- At the DISKPART prompt, type select disk [number]. Select the second disk.
- At the DISKPART prompt, type clean. This removes data and any partitions and volumes from the second disk.
- At the DISKPART prompt, type create partition primary. This creates a partition on the second disk.
- At the DISKPART prompt, type select disk [number]. Enter the first disk number.
- At the DISKPART prompt, type create volume spanned size=1048576. This creates a spanned volume of 1 TB from the two disks.
- At the DISKPART prompt, type exit.
Take the following steps to create a RAID 0 or striped volume using two disks:
- At a command prompt, type diskpart.
- At the DISKPART prompt, type list disk. See the available disks on the system.
- At the DISKPART prompt, type select disk [number]. Select the first disk.
- At the DISKPART prompt, type clean. This erases data and any partition and volumes on the selected disk.
- At the DISKPART prompt, type convert dynamic. This converts the basic disk to a dynamic disk.
- Repeat steps 3-5 for the second disk.
- At the DISKPART prompt, type create volume stripe disk=[disk number 1],[disk number 2]. Enter the proper disk numbers separated by a comma.
- At the DISKPART prompt, type format fs=ntfs quick label="[label name]". This formats the volume with NTFS and adds the label of your choosing.
- At the DISKPART prompt, type exit.
Take the following steps to create a mirrored volume using two disks:
- At a command prompt, type diskpart.
- At the DISKPART prompt, type list disk. See the available disks on the system.
- At the DISKPART prompt, type select disk [number]. Select the first disk.
- At the DISKPART prompt, type clean. This erases data and any partition and volumes on the selected disk.
- At the DISKPART prompt, type convert dynamic. This converts the basic disk to a dynamic disk.
- Repeat steps 3-5 for the second disk.
- At the DISKPART prompt, type create volume mirror disk=[disk number 1],[disk number 2]. Enter the proper disk numbers separated by a comma.
- At the DISKPART prompt, type assign letter=[drive letter]. Enter an unused drive letter.
- At the DISKPART prompt, type format fs=ntfs quick label="[volume name]". Format the volume, and enter a name for the mirrored volume.
- At the DISKPART prompt, type exit.
Take the following steps to create a RAID 5 volume:
- At a command prompt, type diskpart.
- At the DISKPART prompt, type list disk. Output shows available disks.
- At the DISKPART prompt, type select disk [number]. Choose the first disk for the volume.
- At the DISKPART prompt, type clean. This erases data and any partition and volumes on the selected disk.
- Repeat steps 3-4 for the second disk and third disk.
- At the DISKPART prompt, type create volume raid disk=[disk number 1],[disk number 2],[disk number 3]. Enter the three disk numbers separated by commas.
- At the DISKPART prompt, type format fs=ntfs quick label="[volume name]". Format the volume with NTFS, and give the RAID 5 volume a name.
- At the DISKPART prompt, type assign letter=[drive letter]. Enter an unused drive letter.
- At the DISKPART prompt, type exit.
How to delete a volume using diskpart
There are several reasons to remove an existing volume on a disk, such as restructuring disk space or switching file systems. Deleting a volume with diskpart permanently deletes any data on the volume and makes the space available for use.
Take the following steps to delete a volume:
- At a command prompt, type diskpart.
- At the DISKPART prompt, type list volume. Output shows available volumes.
- At the DISKPART prompt, type select volume [number]. Choose the volume to remove.
- At the DISKPART prompt, type delete volume.
- At the DISKPART prompt, type exit.
How to erase disk configuration and data using diskpart
When you have an entire disk to wipe clean, you can use the diskpart clean all command to convert all the stored data into unallocated space. This operation deletes all data on the disk by writing zeros on each disk sector. Diskpart also removes all partition and volume information from the selected drive. If security is not a concern, you can use the diskpart clean command, which removes all partitions or volume formatting from the disk.
Take the following steps to clean a disk:
- At a command prompt, type diskpart.
- At the DISKPART prompt, type select disk [number]. Enter the disk number to wipe.
- At the DISKPART prompt, type clean all.
- At the DISKPART prompt, type exit.
How to troubleshoot problems with diskpart
Most operations that change disk structure using diskpart require administrator privileges, so be sure to run diskpart with the right permissions and start from an elevated command prompt to avoid unexpected issues.
It's helpful to check the status of the disk using the list parameter in diskpart before performing any action on a disk, volume or partition.
The attributes disk command shows the properties of the disk and can check if a disk is set to read-only, which prevents any changes. To allow writes to the disk, run diskpart, select the disk and run the attributes disk clear readonly command.
If you encounter a virtual disk service error when trying to perform a diskpart command, then this could mean the disk is being used. To correct this, try closing any running applications, or reboot the device.
An I/O error when running diskpart could mean several things, including a possible hardware failure, but one of the first troubleshooting steps is to run the chkdsk /f /r command, which checks a disk for any errors and recovers information from bad sectors.
Other ways to use diskpart
For maintenance work that requires a bootable USB flash drive, you can use diskpart to format the partition and set up the file system on the removable drive. Administrators can also use diskpart in both Windows Preinstallation Environment and Windows Recovery Environment to correct disk problems or to configure the machine for deployment.
With the diskpart /s switch, administrators can run scripts to automate tasks associated with setting up Windows computers, such as configuring the disks for multiple systems, adding a recovery partition or wiping all data from a disk to return it to a factory state.
Sample code from the Microsoft site gives examples of how to develop a text-based script file administrators can call from diskpart and run automatically. IT workers can run several diskpart scripts, but Microsoft recommends building in a delay of 15 seconds after a script runs to prevent issues.
Editor's note: This article was updated in August 2024 to improve the reader experience.